« Free Blank World Maps | Main | Dead End Roads: (Baby, It's August...) »
July 31, 2013
Migrating iPhoto Events from MacBook Air to Windows
So, I finally managed to completely choke down my MacBook Air with photos. Sure...it took me 8 months, but I did it.
Along the way, I created a 2nd iPhoto Library, so I now have 2 iPhoto Libraries.
To get the Size and Free Space of the Mac's Hard Disk on Mountain Lion:
Here's how you show your disk's free space on OSX 10.8, step-by-step:
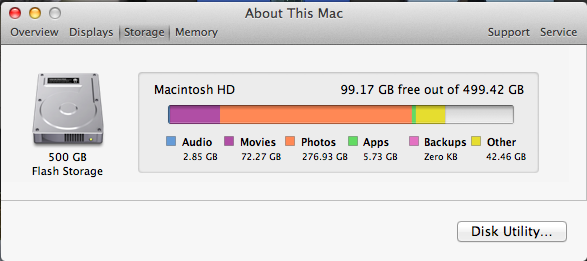
There's a few tricky ways to take a screen-shot of the MacbookAir with Mountain Lion OSX, like I did to get the image above:
Now, I'm a little bit surprised to see that I have 99 gigs of disk space left, as I've been getting the most insane errors from the Apple MacBook Air whining about disk space. So, I dunno. Somehow I've still got 99 gigs to play with, which makes me want to pull my hair out, but let's leave that issue for now. For now, I want to start moving everything off of the MacBook Air so that I can take it on the road again, and start filling it up with pictures all over again.
So, here we go:
The biggest problem I had is that there are two trash cans on the Apple desktop, which is confusing, and they're not the same.
This was very confusing to me, and when I deleted the images from the Event category/tab, the event would always reappear when you least expected it, which is maddening.
Eventually, I figured out that the trash can in the lower right corner pretty much doesn't work with iPhoto. In iPhoto, there's a trashcan on the left side of the screen. This is the one you want to use to delete photos from iPhoto. Also, the shortcut for deleting photos is the Apple-Key with the Delete key. This will delete the images from iPhoto from the Event tab/category.
Posted by Rob Kiser on July 31, 2013 at 10:29 PM
Comments
1. Empty the trash.
2. Reboot.
If that doesn't free space
3. In Disk Utility, select "Erase" and "Erase Free Space".
Or, from the command line, run df -h to see how much disk free space you have.
Posted by: rob on August 1, 2013 at 6:47 PM
Free Up Computer Disk Space
by David Caolo on Aug 8, 2013My main computer is a MacBook Air. I love it dearly. The thin little thing has traveled with me, and I wrote my books on it. It’s a super little machine. It’s got 128 GB of internal flash storage, which sounds like a lot, yet I get that “your startup disk is almost full�? warning all the time. The fact that I photograph my kids all the time doesn’t help. I also love music, movies, and trying new software. Those are all space-hogging activities. What can I do?
.
.
.
Empty the trash. You’d be surprised how often I see digital trash cans that are bulging with files. The act of simply moving a file into the trash doesn’t get rid of it. Empty that virtual trash can. Individual applications (like iPhoto on my Mac and my email program) may also have separate Trash cans and Spam folders that should be emptied, too.
.
.
.
read the whole thing at
unclutterer.com/2013/08/08/free-up-computer-disk-space/
Posted by: rob on August 8, 2013 at 8:52 AM
You're note the only one with this problem.
arstechnica.com/apple/2013/08/deleting-zombie-photos-from-iphoto/Deleting Zombie Photos From iPhoto
The photos check in, but some never check out.
by Iljitsch van Beijnum - Aug 18 2013, 4:45pm MDTRecently I noticed when I delete photos from the iPhoto trash, iPhoto doesn't necessarily delete the image files from its library. My iPhoto library is the single biggest thing on my MacBook Air's hard drive, and it's the reason I had to pay extra for a 256GB SDD rather than use the stock 128GB one. I'm in the habit of taking a bunch of shots of every subject to make sure at least one has the correct focus, exposure, and is level. All this is to say I have a lot of extra photos that I need to get rid of.
But as I noticed, sometimes iPhoto doesn't delete photos when you empty the iPhoto trash. It just removes them from its database so they're no longer visible without deleting the actual image files. Those files still use up disk space—to the tune of 10 GB in my case.
.
.
.
Reader comments 50
It's a relatively short article, with screen shots, so I suggest reading the whole thing.
Posted by: rob on August 19, 2013 at 9:27 AM